Michael wonders how he can center a picture or graphic in a table cell, both vertically and horizontally, and have it stay centered if the cell changes size. He has tried several methods proposed by various websites and forums, but they have all either not worked or been too cumbersome to use.
Before figuring out how to center your image in a table cell, you must understand that there are two ways that graphics can be inserted in a Word document: floating or inline. The format used by Word depends on what you are inserting. If you insert a graphic, it is inline by default. If you insert a shape, it is floating by default. When putting a graphic in a table cell, you"ll never be able to really get it right (and keep it right) if the graphic is floating. You need to make sure it is inline. An inline graphic is pulled off of the graphic "layer" and placed in line with the text that surrounds it. It is, essentially, treated like any other textual character.
So, to put your graphic in the table cell, you need to click within that table cell. I find it very helpful to turn on the display of non-printing characters while doing this. (Click the Show/Hide tool in the Paragraph group on the Home tab of the ribbon.) With non-printing characters displayed, you can easily tell if there are any extraneous characters in the table cell. The only thing you want in the cell is the end-of-cell marker, which looks like a small circle with four little "tails" attached to it. If you have other text in the cell (in addition to graphic you want there), it will throw off your centering efforts.
Make sure the insertion point is just in front of the end-of-cell marker, and then insert the picture. You can make sure the graphic is inline (instead of floating) by right-clicking the just-inserted graphic to display a Context menu. Choose, from the menu, the Wrap Text option and then In Line with Text.
Now do a bit of resizing. Both your graphic and your table cell need to be sized so that the graphic fits fully inside the cell.
Now take care of your alignment by displaying the Layout tab of the ribbon. (This tab is visible when you are working inside of a table.) With the graphic selected or the insertion point otherwise located within the cell that contains the graphic, click the Align Center tool, which is in the Alignment group.
If you hover the mouse pointer over the Align Center tool, you see a ToolTip appear that explains that the tool centers text both horizontally and vertically within the cell. The graphic is centered because you made it inline, which means it is treated as your text is treated. The graphic should now remain centered—both horizontally and vertically—even if you resize the graphic or the cell containing the graphic.
There are a few caveats to this, and they have to do with how Word formats paragraphs. When you click the Align Center tool, Word automatically changes the paragraph alignment for the cell. (You can verify this by looking at the Home tab of the ribbon, where you"ll see that the alignment indicated in the Paragraph group is changed to Center.) What it doesn"t change, however, are other formatting settings such as indentation and spacing.
To correct this, display the Paragraph dialog box. With the insertion point still in the cell containing the graphic, display the Home tab of the ribbon and click the small icon at the lower-right corner of the Paragraph group. (See Figure 1.)

Figure 1. The Paragraph dialog box.
Set the Left, Right, Before, and After controls to 0. Set the Special drop-down list to None and the Line Spacing drop-down list to Single. Click on OK to apply the settings.
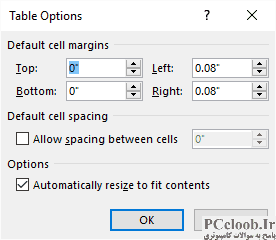
In addition, the table settings can affect how a graphic is centered in the cell. Again, display the Layout tab of the ribbon and click the Cell Margins tool (in the Alignment group). Word displays the Table Options dialog box. (See Figure 2.)

Figure 2. The Table Options dialog box.
Set the Top, Bottom, Left, and Right controls to 0 and feel free to clear the Automatically Resize to Fit Contents check box. Click OK, and these formatting settings are applied. Your graphic should now be exactly centered in the cell.
در نهایت، باید بدانید که ماهیت گرافیک شما میتواند بر میزان مرکزیت آن در سلول جدول شما تأثیر بگذارد. برخی از گرافیک ها دارای ویژگی شفافیت هستند، به این معنی که می توانید بخشی از گرافیک را "از طریق" ببینید. اگر مال شما باشد، ممکن است خارج از مرکز ظاهر شود، در حالی که واقعاً نیست. اگر یک بار روی گرافیک خود کلیک کنید، Word یک کادر با خط نازک در اطراف گرافیک نمایش می دهد. این کادر است که در واقع در مرکز قرار دارد، زیرا نشان دهنده مرزهای گرافیکی که توسط Word درک شده است.